Introduction
Utilize the content in this section to recover Nirmata Private Edition and Kubernetes clusters from a failed tate. After following these steps, high Aaailability configuration will be restored for enterprise-grade deployments.
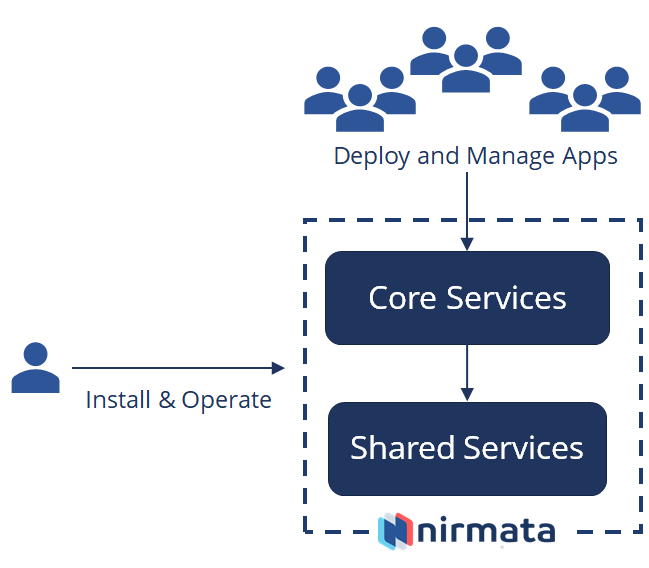
Nirmata Private Edition Platform Architecture
Nirmata Private Edition (Nirmata PE) is comprised of two architectural components (service sets):
- Nirmata Core Services: cluster management, application management logic, and UI
- Nirmata Shared Services: third-party services for messaging, data storage, etc.; such as:
- Mongodb
- Zookeeper
- Kafka
- ElasticSearch
Each service set contains multiple containerized microservices.
Achieving Disaster Recovery
There are multiple ways in which a disasters occur and each requires specific actions to achieve restoration.
The three failure scenarios covered represent the most common failures. Each failure scenario provides a description of the failure impact and the steps necessary to backup and restore servic
Common Failure Scenarios
Scenario 1 - Nirmata PE Cluster is Down
Failure Impact of a Down Nirmata PE Cluster
When a Nirmata PE cluster loses service the Kubernetes cluster may not go down.
Nirmata PE manages Kubernetes clusters through an API. Since the Nirmata PE cluster is deployed in a separate node from Kubernetes cluster, the Kubernetes cluster only goes down when the entire Pod or rack system goes down.
Unless this happens, it is likely that the Kubernetes cluster will maintain service and operation, which means minimal impact to applications.
Nirmata PE has a microservices based architecture and is built as a set of container services. This ensures that when a component goes down it comes right back up.
In HA configuration, a Nirmata PE cluster will go down only when all three nodes that form the cluster go down.
If a specific component goes down, the Kubernetes cluster recreates the down pd and the service.
How to Perform a Backup When the Nirmata PE Cluster is Down
To prepare Nirmata PE for recovery, start by backing-up and securing essential Nirmata PE installation configuration and state data.
Backup the following key components:
- Nirmata PE certificates
- Nirmata PE installation configuration
- Nirmata PE state - which is stored in the MongoDB database as part of shared services in Nirmata PE
Use the following process to backup the key components described:
- As a best practice, store certificate files in the installer directory and backup the original certificate files. These files are required to recover Nirmata PE in the correct configuration and will be restored in the new installer directory.
- Configuration information is stored in the nirmata.conf file in the installer directory. Create a backup of this file.
- Nirmata PE utilizes its own CLI command to perform routine backups of the database. Use the Nirmata PE CLI Backup Command as part of a cronjob to force a backup.
Nirmata PE CLI Backup Command:
nadm backup -n <install-namespace> -d <backup-dir>
How to Recover from a Nirmata PE Cluster Failure
After performing the backup steps described, complete the following service recovery steps:
- Restore the backed-up files and certificates in the installer directory.
- Install a new instance of Nirmata.
- Run the Nirmata PE Restore CLI Command to restore the database with th state information of the down cluster.
Nirmata PE Restore CLI Command:
nadm restore
Scenario 2 - Kubernetes Cluster is Down
Failure Impact of a Down Kubernetes Cluster
If a Kubernetes cluster is installed in a High Availability configuration, the Kubernetes cluster will continue to operate until the last master node goes down.
Even when the master node goes down, worker nodes may continue to operate and run the containers orchestrated on those nodes. If certain applications or pods were running on those master nodes, those applications and pods will go down. However, if another master node exists, Kubernetes will look to recreate those pods on other available nodes.
Recovering from a master node failure is more complex than recovering from a worker node failure. However, master node failure does not mean that the cluster and all workloads are lost.
The cluster and all workloads will continue running with exactly the same configuration as before the failure. Applications running in the Kubernetes cluster will still be usable. However, it is not possible to create new deployments or to recover from node failures without the master node.
How to Perform a Backup When a Kubernetes Cluster is Down
There are several components required to recover a master node on a Kubernetes cluster:
- Certificates
- Secrets
- etcd Database
- Persistent Volumes (stateful containers only)
How to Recover from a Kubernetes Cluster Failure
Currently, Kubernetes has the latest release 1.12 with snapshot and recovery capability in beta.
Nirmata PE will support these features for backup and restore capability as they become generally available. Until snapshot recovery is available, Nirmata recommends using kubeadm to recover.
Scenario 3 - Site Hosting Nirmata PE and Kubernetes Cluster is Down
Failure Impact of a Down Site with Nirmata PE and Kubernetes Cluster
When the site hosting Nirmata PE and the Kubernetes cluster goes down, both Nirmata PE and the Kubernetes Cluster must be restored.
How to Perform a Backup When the Site Hosting Nirmata PE and the Kubernetes Cluster Goes Down
When a site goes down and Nirmata PE and Kubernetes, are hosted in the site, backups for both Nirmata PE and Kubernetes cluster master nodes are required to restore the entire setup.
As a best practice, store backups for Nirmata PE and Kubernetes clusters in more than one distinct data center across different regions. This ensures that disaster recovery is possible even when a region is down.
Refer to: How to Perform a Backup When the Nirmata PE Cluster is Down How to Perform a Backup When a Kubernetes PE Cluster is Down
How to Recover from Failure When the Site Hosting Nirmata PE and the Kubernetes Cluster Goes Down
When a site goes down and Nirmata PE and Kubernetes, are hosted in the site, both Nirmata PE and Kubernetes cluster master nodes must be recovered.
Refer to: How to Recover from a Nirmata PE Cluster Failure How to Recover from a Kubernetes Cluster Failure
How To Install a New Instance of Nirmata Private Edition
Nirmata PE can be installed on virtual or physical servers
Prerequisites
- Ubuntu 16.04+ (bare-metal)
- Docker 17.03 (recommended); Docker 1.11, 1.12, or 1.13 (minimum)
- Each node requires access to AWS S3 bucket and www.nirmata.com
Step 1: Download Nirmata PE Installer
Download the install package on a node. Un-archive the contents of the package:
tar xvf nirmata-pe-k8s-installer.tgz
Step 2: Install Nirmata Private Edition
Nirmata PE can be installed as a single replica, a multi-node Kubernetes Cluster, or as a High Availability Configuration on a 3-node cluster.
Install Nirmata PE as a Single Cell Replica
To install a single node Kubernetes cluster, run the Install Single Node Kubernetes Cluster Command.
Install Single Node Kubernetes Command:
nadm init
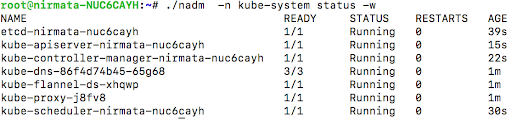
nadm -n kube-system status -w
Verify that all pods are running by checking the system status.
Next, install Nirmata PE on single node cluster by running the Install Nirmata PE on Single Node Cluster Command. Replace the namespace �sandbox� to reflect the applicable configuration.
Install Nirmata PE on Single Node Cluster Command:
nadm install -n sandbox
Check the pod status by running the Check Pod Status Command. Replace the namespace �sandbox� to reflect the applicable configuration.
Check Pod Status Command:
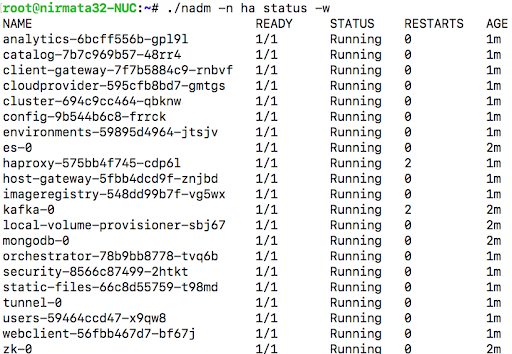
nadm status -n sandbox
Install Nirmata PE as a Multi-Node Kubernetes Cluster
To install Nirmata PE as a multi-node Kubernetes cluster, run the Install Multi-Node Kubernetes Cluster Command on the master node.
Install Multi-Node Kubernetes Cluster Command:
$nadm init
It may take several minutes for the command to run. When complete, the output will display successful start message.
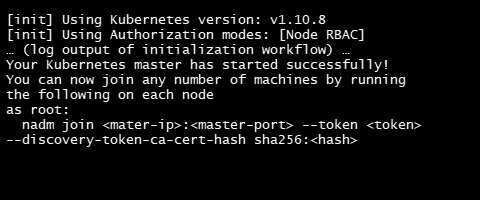
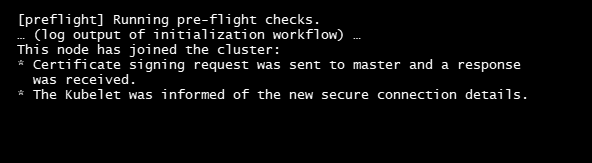
To add new nodes to the cluster, run the command that was output by �nadm init.�

After a node is added to the cluster, a confirmation message will display.
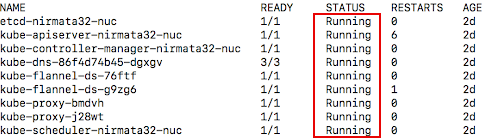
To confirm that all of the components are running on the Kubernetes cluster, run a Check Status on Master Node command.
Check Status on Master Node Command:
nadm -n kube-system status -w
After all pods have started, review the output to verify that all pods are running.
Install Nirmata PE as a High-Availability Configuration on a 3-Node Cluster
Before installing Nirmata PE as a High Availability Configuration on a 3-Node Cluster, verify that a 3-Node cluster exists by running Nirmata PE Node Status Command.
Nirmata PE Node Status Command:
nadm status node
If three a 3-node cluster exists, the command will return an output that shows three nodes in Ready status.

Generate three replica YAMLs for Nirmata PE by running the Replicate Nirmata PE Command.
Replicate Nirmata PE Command:
nadm generate --replicas=3
Verify that the three replica YAMLs generated in: opt/niramta/yamls-generate/
Next, install Nirmata PE using the Install Nirmata PE Command and the path to the three newly generated replica YAMLs, i.e.: /opt/nirmata/yamls-generate/yamls-xx-xx-xx-xx/, in place of $PATH.
Install Nirmata PE Command:
nadm install -d $PATH
After installing NirmataPE , check the pod status using the Check Pod Status Command.
Check Pod Status Command:
nadm status -n nirmata
Uninstall Nirmata Private Edition
Nirmata PE can be uninstalled from a directory or from the namespace using the Uninstall Nirmata PE Command.
If installed as a Single Cell Replica or Multi-Node Kubernetes Cluster, uninstall Nirmata PE from the namespace.
If installed as a High-Availability 3-Node Cluster, uninstall Nirmata PE from the directory.
Uninstall Nirmata PE Command (namespace):
nadm uninstall -n sandbox --all
Remember: Replace the namespace sandbox to reflect the applicable configuration.
Uninstall Nirmata PE Command (directory):
$ nadm uninstall -n sandbox -d $PATH
Remember: $PATH is the path to the three generated replica YAMLs, i.e.: /opt/nirmata/yamls-generate/yamls-xx-xx-xx-xx/, in place of $PATH.
After uninstalling Nirmata PE, clean-up the cluster by running the Cluster Reset Command.
Cluster Reset Command:
nadm reset
Step 3: Install a x509 Certificate (High-Availability Configuration ONLY)
When installed as a High- Availability Configuration on a 3-Node Cluster, Nirmata PE utilizes a load-balancer to communicate with Kubernetes clusters and users.
The load-balancer requires a valid certificate for the URL that is used to access Nirmata PE. If a certificate is not available, generate a self-signed certificate.
To generate a self-signed certificate, SSH to the node that will be used to run Nirmata Services. Then, create a directory to store the generated certificate.
Directory to Store Generated Certificate:
sudo openssl req -x509 -nodes -days 365 -newkey rsa:2048 -keyout certificates/nginx.key -out certificates/nginx.crt
Create Certificate Command:
sudo mkdir certificates
Enter the required parameters:
- Country Name (2 letter code) [AU]:US
- State or Province Name (full name) [Some-State]:New York
- Locality Name (eg, city) []:New York City
- Organization Name (eg, company) [Internet Widgits Pty Ltd]:Acme
- Organizational Unit Name (eg, section) []:I.T
- Common Name (e.g. server FQDN or YOUR name) []:server_IP_address or DNS
- Email Address []:admin@your_domain.com
Step 4: Login to Nirmata PE
When installed as a High- Availability Configuration on a 3-Node Cluster, Nirmata PE utilizes a load-balancer to communicate with Kubernetes clusters and users.
The load-balancer requires a valid certificate for the URL that is used to access Nirmata PE. If a certificate is not available, generate a self-signed certificate.
To generate a self-signed certificate, SSH to the node that will be used to run Nirmata Services. Then, create a directory to store the generated certificate.
Directory to Store Generated Certificate:
sudo openssl req -x509 -nodes -days 365 -newkey rsa:2048 -keyout certificates/nginx.key -out certificates/nginx.crt
Create Certificate Command:
sudo mkdir certificates
Enter the required parameters:
- Country Name (2 letter code) [AU]:US
- State or Province Name (full name) [Some-State]:New York
- Locality Name (eg, city) []:New York City
- Organization Name (eg, company) [Internet Widgits Pty Ltd]:Acme
- Organizational Unit Name (eg, section) []:I.T
- Common Name (e.g. server FQDN or YOUR name) []:server_IP_address or DNS
- Email Address []:admin@your_domain.com
Step 5: Add the Nirmata PE License
After logging in to Nirmata PE, navigate to Account and select Settings. Update the license key.
When a valid license key is added, the Trial message is removed.
Docker CE Installation on RHEL 7
Before installing Docker CE on RHEL 7, disable to firewall to prevent interference with Docker.
To disable the firewall, run the Disable Firewall Command.
Disable Firewall Command:
sudo systemctl disable firewalld
After disabling the firewall, setup the Docker CE repository on RHEL.
sudo yum install -y yum-utils
sudo yum-config-manager --add-repo https://download.docker.com/linux/centos/docker-ce.repo
sudo yum makecache fast
Next, install the latest supported version of Docker CE on RHEL or a specified version of Docker CE.
To install the latest supported version of Docker CE on RHEL, use the following command:
sudo yum -y install docker-ce-17.06.0.ce-1.fc25
To specify a version of Docker CE, use the following command and replace version and release with the appropriate version and release identifiers:
sudo yum -y install docker-ce-<version>-<release>
After installing Docker CE, start Docker using the Start Docker CE Command.
Start Docker CE Command:
sudo systemctl start docker
Verify that the Docker CE installation is complete using the Test Docker CE Installation Command.
Test Docker CE Installation Command:
sudo docker run hello-world
If SELinux is not already installed, use the following command instead to install SELinux and Docker CE:
# pre-requisite for container-selinux-2.9-4.el7.noarch.rpm
sudo yum install policycoreutils-python

wget https://mirror.centos.org/centos/7/extras/x86_64/Packages/container-selinux-2.9-4.el7.noarch.rpm
sudo rpm -i container-selinux-2.9-4.el7.noarch.rpm

#Set up the Docker CE repository on RHEL:
sudo yum install -y yum-utils
sudo yum install -y device-mapper-persistent-data lvm2
sudo yum-config-manager --enable rhel-7-server-extras-rpms
sudo yum-config-manager --add-repo https://download.docker.com/linux/centos/docker-ce.repo
sudo yum makecache fast

# Install the latest supported version of Docker CE on RHEL:
sudo yum -y install docker-ce-17.06.0.ce-1.fc25

#Start Docker:
sudo systemctl start docker

#Test your Docker CE installation:
sudo docker run hello-world

# configure Docker to start on boot
sudo systemctl enable docker

# add user to the Docker group
sudo usermod -aG docker jethro

# install Docker Compose:
# install python-pip
wget https://dl.fedoraproject.org/pub/epel/epel-release-latest-7.noarch.rpm

sudo yum install ./epel-release-latest-7.noarch.rpm
sudo yum install -y python-pip

sudo pip install docker-compose

# upgrade your Python packages:
sudo yum upgrade python*
How to Set Log Limits on Docker CE Container Logs
By default, container logs are not configured to rotate data or store to a limited maximum size. In some, long-running containers, a log file can grow so large that it compromises disk space.
To set log limits for the containers on a host, configure --log-opt with a max-size and max-file. When configured this way, container logs are rolled over after reaching the specified limit and only the specified number of files are saved.
To generate a list of the largest files to confirm that the log files are using a large percent of the disk space run the File List Command.
File List Command:
# find /var/lib/docker/ -name "*.log" -exec ls -sh {} \; | sort -n -r | head -20
# du -aSh /var/lib/docker/ | sort -n -r | head -n 10
To remove a log file on the host, run the Remove File Command to clear the contents and reduce the file size.
Remove File Command:
# cat /dev/null > /var/lib/docker/containers/CONTAINER_ID/CONTAINER_ID-json.log
OR
# cat /dev/null > $(docker inspect --format='{{.LogPath}}' CONTAINER_ID)
Use the Configure File Size Command to specify maximum file size and number.
Configure File Size Command:
# cat /etc/sysconfig/docker
OPTIONS='--insecure-registry=172.30.0.0/16 --selinux-enabled --log-opt max-size=50m --log-opt max-file=5'
File size configuration changes will take effect after a Docker CE restart. To restart Docker CE, use the Restart Docker CE Command.
Restart Docker CE Command:
# systemctl restart docker
For more information on setting file log limits, click here.
Troubleshooting Nirmata PE Installation
To troubleshooting a Nirmata PE installation check through the following common issues. Contact Nirmata Support if the problem persists.
Kafka Container Fails to Start or Keeps Restarting
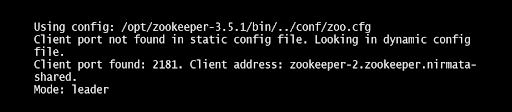
Kafka containers experience failure or restart issues when Kafka cannot connect to Zookeeper.
First, verify that Zookeeper is running using check Zookeeper Command.
Check Zookeeper Command:
kubectl exec zookeeper-0 -n nirmata-shared bin/zkServer.sh status
If Zookeeper is running, the command will return the following:
Web Console Cannot Be Reached
Verify that all the services are running using docker ps or kubectl get pods command.
Restart any services that are not running.
Verify that the the frontend load balancer is reachable using the Curl Command.
Curl Command:
curl https://<nirmata-url>/webclient
Review the frontend load balancer logs for errors. To view the logs run the View Logs Command.
View Logs Command:
docker logs -f nginx
If errors are found, restart the load balancer,
If the any services or the load balancer cannot be restarted, contact Nirmata Support.
Unable to login to Nirmata PE
Verify that all the services are running using docker ps or kubectl get pods command.
Review User Service and Security Service logs for errors. Restart any User Service or Security Service with errors.
If the User Service or Security Service cannot be restarted, contact Nirmata Support.
Setup Virtual Machine Template
To setup a virtual machine (VM) template, run the Skip Broken and Install Commands.
Skip Broken Command:
yum update --skip-broken -y
Install Command:
yum install net-tools
Before saving the VM as a template, remove the file: /opt/nirmata/conf/host_agent.id and the directory: /opt/nirmata/db/
/etc/sysconfig/network-scripts/ifcfg-nameofmaininterface and remove the UUID
The configuration line should look like - UUID=""
Next, install Docker and the Nirmata agent using the Docker.sh Command.
Docker.sh Command:
#!/bin/bash -x
# Install Docker
sudo yum update -y

sudo tee /etc/yum.repos.d/docker.repo <<-'EOF'
[dockerrepo]
name=Docker Repository
baseurl=https://yum.dockerproject.org/repo/main/centos/7/
enabled=1
gpgcheck=1
gpgkey=https://yum.dockerproject.org/gpg
EOF

sudo mount -o remount,rw '/sys/fs/cgroup'
sudo ln -s /sys/fs/cgroup/cpu,cpuacct /sys/fs/cgroup/cpuacct,cpu

sudo yum install -y docker-engine
sudo systemctl enable docker.service
sudo systemctl start docker
After installing Docker and the Nirmata agent, run an Install Cleanup Command.
Install Cleanup Command:
# Stop and remove any running containers
sudo docker stop $(sudo docker ps | grep "flannel" | gawk '{print $1}')
sudo docker stop $(sudo docker ps | grep "nirmata" | gawk '{print $1}')

sudo docker stop $(sudo docker ps | grep "kube" | gawk '{print $1}')
sudo docker rm  $(sudo docker ps -a | grep "Exit" |gawk '{print $1}')

# Remove any cni plugins
sudo rm -rf /etc/cni/*
sudo rm -rf /opt/cni/*

# Clear IP Tables
sudo iptables --flush
sudo iptables -tnat --flush

# Restart docker
sudo systemctl stop docker
sudo systemctl start docker
sudo docker ps

# Deletes the cni interface
sudo ifconfig cni0 down
sudo brctl delbr cni0
sudo ifconfig flannel.1 down
sudo ip link delete cni0
sudo ip link delete flannel.1

# Remove cluster database
sudo rm -rf /data
If setting up CentOS or RHEL, disable SELinux and setup iptables.
To disable SELinux, navigate to: edit/etc/selinux/config
Set SELINUX=disabled
Reboot for the changes to take effect.
Verify that SELinux is disabled using a Sestatus Command:
SELinux Status Command:
sestatus
Configure the iptables on the VM template node with following commands:
sudo iptables --policy INPUT ACCEPT
sudo iptables --policy OUTPUT ACCEPT
sudo iptables --policy FORWARD ACCEPT
sudo iptables -Z
sudo iptables -F
sudo iptables -X
Finally, configure disk enable.UUID=TRUE in the VM Configuration.
For more information on enabling disk UUID on virtual machines, click here.
More Nirmata Setup Help
Setup vSphere Private Cloud-Provider
Setup a vSphere private-cloud provider
Setup Nodes and Load-Balancer for HA configuration
Configure Storage-Class for vSphere Cluster Type
Configure Kubernetes Cluster on vSphere
Configure VMware vSphere Cloud Credentails
Add Storage Class Template:
metadata:
  name: filesystem
  selfLink: /apis/storage.k8s.io/v1/storageclasses/filesystem
  labels:
    nirmata.io/storageclass.name: filesystem
provisioner: kubernetes.io/vsphere-volume
apiVersion: storage.k8s.io/v1
reclaimPolicy: Retain
kind: StorageClass
parameters:
  diskformat: thin